Tuesday 31 July 2012

Simple Chicken Pad Thai


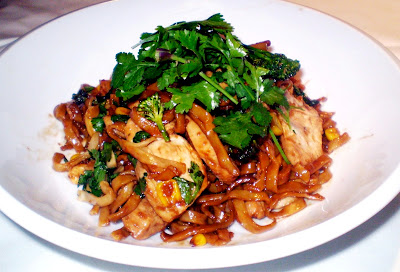
So last night it was my turn to make dinner so I decided to make a quick and easy meal for my family. I love Thai food and am always looking for something different and fun to try, with the Woolworths Pad Thai Noodles it makes this meal so easy and is ready within minutes!

Simple translated Pad Thai means "Thai style fried noodles". I had some chicken in the fridge so i used that but you can also use prawns or even tofu. The vegetables are only limited by your imagination any combination will be delish. I used my favourite veggie of the moment Tenderstem Broccoli and some frozen corn i found in my freezer.

Here's the recipe:

Chicken Pad Thai


Ingredients: (Serves 2 to 3)

  • 2 tablespoons of Sesame oil
  • 3 chicken breasts
  • 1 clove of garlic (crushed)
  • 1 teaspoon of ginger
  • Handfull of broccoli
  • 1/2 cup of corn
  • 400g Pad Thai Noodles
  • 2 tablespoons of Indonesian Sweet Soya sauce
  • 125ml of Oyster sauce
  • Fresh coriander and crushed roasted peanuts to serve


Ingredients

Method:

  1. Heat the oil in a large wok.
  2. Add the sliced chicken breasts and stir fry for 3 minutes.
  3. Add the crushed garlic and the ginger and stir fry for a further 1 minute.
  4. Add 1 handful of broccoli and  the corn (or your choice of vegatables) and stir fry for a further 2 minutes.
  5. Add the noodles and mix through 2 tablespoons of Indonesian Sweet Soya sauce and 125ml of Oyster sauce.
  6. Stir fry for a further 2 minutes until the noodles are heated through and serve with fresh coriander and a handful of roasted crushed peanuts.

Mmmmm...


Monday 30 July 2012

River Cafe, Constantia Uitsig Winter Lunch

This past weekend I went to the River Cafe at Constantia Uitsig for their Winter special menu. There are a couple of different choices that can be had amoungst their menu's. One can either choose from their classic menu (where the items vary in price) or there is their Winter special menu where one can either have a 3 course meal with tea/coffee for R119 or a 2 course meal for R99.

I had the 2 course menu which had fairly large portions and food that was scrumptious! I chose a starter and a main course (no dessert) and both my courses were very satisfying and delish!

Starter:

To start I had Bruschetta (ciabatta toasted in the oven with a splash of olive oil, salt and pepper until crisp) topped with caramelised onions, roasted cherry tomatoes, rocket, crispy bacon and mozzarella drizzled with a balsamic glaze. It was absaloutely delicious and big enough to share with another person, which is exactly what I did and it worked out really well.

Starter: Bruschetta

Main Course:


I am a pasta fanatic, I honestly could eat it for breakfast, lunch and supper, 7 days of the week and would not get tired of it. So naturally I found the pasta option on the menu, and went for it... and to say the least " I was not disappointed"

It was a spinach tagliatelle mixed in a mushroom, spinach, sundried tomato and cream sauce topped with grated parmesan and a sprig of Italian flat leaf parsley. I must admit that I was very full after my last fork full, but it was delightful to the palette and if only I'd had leftovers, I would have eaten it for dinner that night too.

The other aspect to the dish that made me ever so happy was the parmesan cheese. Often restaurants decide to put a rubbery, tasteless version of "parmesan cheese" on the table which really does not appeal to me, but this was REAL parmesan cheese, which added to the flavour of the dish and made it that much more delicious!


Main Course: Spinach tagliatelle in a mushroom, sundried tomato,
spinach and cream sauce topped with grated parmesan
I had an absalutely splendid time there and would recommend it to anyone who would like to go for a relaxing, laid back lunch where delightful food is served. Thank you River Cafe.

Sunday 29 July 2012

Delish Chocolate Brownies

Today was a "chocolate brownie day." They are super quick to make, so moist and decadently chocolatey! I absolutely love this recipe, it's 1 that my sister brought home from her home economics class when she was still at school and ever since then it is the "go to" brownie recipe in our household.

Here is the recipe for everyone:

Cara's Magical Chocolate Brownies

Ingredients:

  • 250g butter
  • 2 cups (500ml) caster sugar
  • 1/2 cup (125ml) cocoa
  • 3 large eggs
  • 1.5 cups (375ml) flour
  • 2tsp (10ml) vanilla essence
  • 2 cups (500ml) nuts (optional) (I never put them in mine)

Ingredients

Method:

  1. Preheat oven to 160 degrees centigrade
  2. Melt butter, add sugar and mix well.
  3. Add eggs one by one.
  4. Add the rest of the ingredients (sieve flour and cocoa)
  5. Mix well
  6. Pour into a greased oven pan (20cm x 20cm)
  7. Bake for +/- 30mins
  8. Cut when cool and sprinkle with icing sugar.
Decadent, moist and delicious brownies


Friday 27 July 2012

Iced Vanilla Cookies

These biscuits are quite impressive little works of "art", the biscuit itself is sweet, chewy and delicious and the icing just adds that extra flare that appeals to the eye. I have to admit that icing these biscuits can become quite time consuming as it isa process, but if you are just doing a simple design such as coloured or white heart shaped biscuits or square biscuits then I would go for it, especially to impress your guests.

So, if you have some time on your hands as well as a steady hand then give these biscuits a bash!
Here's the recipe:

Vanilla Sugar Cookies (makes +/- 25 medium sized cookies)

Ingredients:

  • 200g soft butter
  • 200g caster sugar
  • 1 egg lightly beaten
  • 400g plain flour + more for dusting
  • 3ml vanilla powder/ seeds from 1 vanilla pod

Ingredients

Method:

  1. Preheat the oven to 180 degrees centigrade
  2. Using an electric mixer with a paddle attachment, cream the butter, sugar and vanilla until just becoming creamy in texture. DON'T overwork.
  3. Beat in the egg until well combined.
  4. Add the flour and mix on a low speed until a dough forms.
  5. Place the dough on a floured surface and knead it briefly
  6. roll out to an even thickness.
  7. Use cookie cutters to cut out your shapes and place on a baking tray (use a pallette knife to lift them) 
  8. Bake for 6-10mins until golden brown
  9. Cool on a cooling rack


Before baking

After Baking

Royal Icing:

Ingredients:

  • Whites of 2 medium eggs
  • 500g icing sugar
  • squeeze of lemon juice

Method:

  1. Lightly beat your egg whites
  2. Place the sugar in a bowl of an electric mixer
  3. add 3/4 of the lightly beaten egg whites and the lemon juice, start mixing on a low speed.
  4. Once well combined, check the consistency. If the icing looks dry and crumbly on the sides add more egg white until the icing looks smooth but not wet.
  5. Keep mixing on a low speed until it has reached soft peak consistency.
  6. Put the icing in a small piping bag with a small round holed nozzle.
  7. Pipe border lines on your biscuit.
  8. Once you have piped all your border lines, add a little water to your icing to make it into a runny consistency.
  9. Flood the inside of your borders and allow the icing to dry before decorating further.
  10. Some edible glitter would make these delights look marvelous!

Voilla!

Thursday 26 July 2012

Orange flavoured Creme Caramel

This is one of my absaloute favourite desserts it is so light, sweet and smooth on the palette and instantly melts in your mouth. I personally could eat if for breakfast, lunch and supper, so if you too are a fan, but have never made it yourself, give it a try! here is the recipe:

This recipe gives the dessert a subtle orange flavour, the orange zest can be substituted for 3ml vanilla extract and the cointreu can be removed all together for a vanilla flavoured creme caramel.

Orange flavoured Creme Caramel (serves 6)

Ingredients:

for the creme:
  • 3 eggs
  • 3 egg yolks
  • 60ml sugar
  • 750ml milk
  • zest of half an orange
  • 15ml Cointreau (orange liquer)
for the caramel:
  • 250ml sugar
  • 250ml water


Ingredients


Method

To make the caramel:

  1. Pour the sugar and the water into a heavy based pan, heat on low and stir making sure that all the sugar dissolves (DO NOT boil until all the sugar is dissolved)
  2. Once the sugar has dissolved put the heat on high and allow to boil DON'T stir. (if sugar begins to darken on the sides of the pan brush with water)
  3. Once the mixture turns into a light caramel colour, remove from the heat and pour into your dariole moulds or cake tin ( depending on the size you're making)

To make the Creme:

  1. Preheat the oven to 160 degrees centigrade
  2. Scald the milk and orange zest together in a saucepan.
  3. Beat the eggs, egg yolk, sugar and cointreau together until combined.
  4. Slowly add the scalded milk mixture to the egg mixture.
  5. Strain the mixture through a sieve.
  6. Make sure there are no bubbles or foam in the milk mixture, if there are, scoop them off with a metal spoon.
  7. Pour the egg and milk mixture into the dariole moulds/cake tin and cover with foil.
  8. Put the moulds/tin into a large oven-proof dish half filled with water, reaching halfway up the sides of the moulds.
  9. Cook in the oven for 45mins (dariole moulds|) or 1 hour (cake tin)
  10. When ready the creme caramel should be firm to the touch and to test, insert a knife and if it comes out clean it is ready, if not, leave it in the oven for a bit longer.
  11. Allow to cool in the fridge before serving.
  12. To unmould, slide a smooth bladed knife around the edge of the creme caramel

Success!

Wednesday 25 July 2012

Masterchef South Africa

WOW! The last 2 standing Deena and Sue-anne have really come a long way since the 1st Masterchef aired. I remember thinking to myself, is this going to be another embarrassing South African rendition of a Television show that I have really enjoyed in the past? or are they going to pull this one off?


At first I was a bit sceptical of the show but I didn't lose hope and grew to love it. Every Tuesday night I was glued to my TV and made sure that my family knew I was watching Masterchef and was not prepared to be answering phone calls or any questions for that matter...it was my time.

To be the winner of Masterchef would undoubtedly be a dream of mine. If food is your passion then this is a calling for you, the prize alone would change your life, but even the experience would leave a mark that no person could ever erase.

For those of you who dont know what the prize is, I'll enlighten you:
The winner of Masterchef South Africa won the following things:

  1. R250 000 from Robertsons
  2. A brand new Hyundai Elantra 1,6 GLS
  3. A 7 day culinary experience in Italy and an Italien cookery course, courtesy of Woolworths
  4. Nederburg Winemaster's Reserve wines and a customised sommelier course
AND last but not least

    5. The Southern Sun restaurant at Sun Square Montecasino

Now if that didnt excite you then I dont know what would!

I am absaloutely delighted with the winner of Masterchef South Africa (I won't spoil it for those of you who haven't yet watched) But this person deserved the prize from the moment they started the competition, they showed a passion for cooking, were continuously humble and never once gave up on themself no matter what, they were truely inspiring and made watching the show a heart warming experience.

This was a brilliant season, and I am looking forward to the Masterchef South Africa's in the future.

Tuesday 24 July 2012

Left over chicken? What I did with mine:

So we had left over chicken from Sunday's roast and I wasn't interested in eating the same thing for dinner on Monday night, so I decided to make it into something else along with the mushrooms we had lying in the fridge... At first I thought a pie would be nice, but then I didn't feel like that either, I then thought maybe a lasagne, but couldn't find a recipe that tickled my tastebuds... so I opted to make a pasta sauce from my head, to add to some pasta, as time too was limited.

It was quick to make and delicious to eat.
Heres what I used:

Creamy tomato, chicken and mushroom pasta:

Ingredients:

  • 1 packet of Penne Pasta
  • 200g cooked, boneless chicken diced
  • 1 tin of chopped tomatoes
  • 100ml water
  • 1 onion, chopped
  • 2 cloves garlic, crushed and put into 20ml olive oil
  • 15ml coriander, chopped
  • 100g mushrooms, chopped
  • 125ml cream
  • salt
  • pepper
  • chilli flakes (optional)

Ingredients (Excluding the water, salt, pepper and chilli flakes)


Method:

Boil a pot filled with water and a pinch of salt. Once the water is boiling add the pasta for +/- 8mins

Put the onion and garlic oil and chopped coriander into a medium sized saucepan on a medium heat and fry until the onions are soft and glassy.
Add the mushrooms and continue to fry until mushrooms have shrunken and are browning.
Add the chicken.
Add the tinned tomatoes and water and allow to simmer for 5 minutes.
Add the cream
Season with salt, pepper and chilli flakes if desired

Serve on the pasta and garnish with some grated parmesan and a few coriander leaves


Bon Appetit!

Monday 23 July 2012

Delicious Tea-time delights

Today I came home and thought to myself what would be a quick, easy and hassle free tea time treat to whip up, seeing as we have run out of things other than rusks to dip in our tea in my household. So I flipped through some recipe books to see if anything inspired me, and there they were... Viennese Fingers.

These biscuits melt in your mouth, they are delicious and they are the perfect treat to serve with a cup of hot tea or coffee. Want the recipe?? I have it for you!

Viennese Fingers (makes 14 biscuits)

Ingredients:

  • 100g softened butter
  • 40g icing sugar
  • 2 egg yolks
  • 1.5 teaspoons natural vanilla extract
  • 125g plain flour
  • 100g dark chocolate
  • 30g extra butter

Ingredients for Viennese Fingers

Method:

  • Preheat the oven to 180 degrees centigrade
  • Line a baking sheet with baking paper or a silicone mat (if you have one at home)
  • Cream the butter and icing sugar together until light and fluffy.
  • Add the egg yolks (1 by 1) and the vanilla extract gradually and beat thoroughly.
  • Sift in the flour, mix until the mixture is just combined and smooth.
  • Spoon the mixture into a piping bag with a fluted nozzle and pipe the mixture into wavy lengths on the baking tray.
  • Bake for 12 minutes or until golden.
  • Cool on the tray and then transfer to a wire rack.

To make the chocolate dipping sauce:

  • melt the 30g butter and chocolate together in the microwave of over a bowl of hot water, stirring occasionally so that it doesnt catch at the bottom of the dish.
  • When the chocolate and butter are combined, dip half the biscuit into the mixture and leave to set on a piece of baking paper or foil. 

  • Store in an airtight container for up to 2 days.

Delicious Viennese fingers!

Sunday 22 July 2012

Sunday lunch.

The weather in Cape Town is still miserable making it the perfect day for a hearty Sunday lunch in my home. The main meal consisting of Roast lamb, Roast chicken, roasted butternut, roasted potatoes, broccoli with a cheesy white sauce and delicious homemade gravy got our tummy's full and made us all very sleepy, BUT...there was still dessert, and this was my "department."

For dessert I made decadent, gooey, rich chocolate pots (Once again using Nigella Lawson's recipe: "Chocohotpots"). The center of the dessert caves in...which in most cases bakers would be distraught, but in this case the name of the dessert fits perfectly as it really does look like a chocolate "pot".

I served these decadent delights with some homemade custard (using custard powder) and a chocolate cigar.

The chocolate pots were a hit! And if you yourself are a chocolate lover I suggest you give them a try. The recipe is quick and easy.

Chocolate Pots: (Serves 4)

Ingredients:

  • 125g butter, and some extra for greasing
  • 125g dark chocolate
  • 2 eggs
  • 150g caster sugar
  • 3 tablespoons (45ml) flour
  • 100g white chocolate chips

Ingredients

Method

Preheat the oven to 200 degrees centigrade

Grease 4 150ml ramekins with the extra butter,

In the microwave, in a bowl, melt the butter and dark chocolate, set aside to cool.

In another bowl, mix the eggs with the sugar and the flour, then add the cooled chocolate-butter mixture. Fold the white chocolate chips into the cooled chocolate batter.

Divide the mixture between the 4 ramekins.

Bake in the preheated oven for 20 minutes. The tops will sink and crack and underneath will be gooey chocolate.

Serve hot.

sprinkled with icing sugar, served with a chocolate cigar and custard.
This recipe was derived from Nigella Lawson's "Feast"

Saturday 21 July 2012

Pancakes on this cold, wintery day.

Today was a day for pancakes in Cape Town. The rain was pouring, the wind was howling and nothing seemed more right than inviting friends over for a batch of pancakes with sliced banana, toffee sauce and ofcourse cinnamon sugar, golden syrup and lemon juice.

It is such a quick mixture to just whip up and make and therefore we will share it with all of you.

Pancakes: (serves 8)

Ingredients:

  • 1 egg
  • 1 cup (250ml) Flour
  • 1 cup (250ml) Milk 


Ingredients for the pancake batter. (Batter in the bowl) I made a double quantity (hence the 2 eggs)
 

Method:


Sift the flour into a bowl. Make a well in the center and add the egg and milk and mix brisky with a whisk, ensuring no lumps are visible.

Heat a non stick pan, lightly greased... and start frying.

Flip the pancakes when they begin to curl at the edges.

serve hot with lemon juice, cinnamon sugar and syrup


Success! Delicious, golden pancakes.
 To make the toffee sauce is easy too! here is the recipe:

Nigella Lawson's Sticky Toffee sauce:

Ingredients:

  1. 175g dark brown sugar
  2. 30ml/g golden syrup
  3. 175g unsalted butter
  4. 150ml double cream (don't stress, pouring cream is fine too.)

Method:

Put the sugar, syrup and butter in a saucepan and heat slowly, allowing the butter to melt and the sugar to dissolve. Bring to the boil for a few minutes.

Add the cream, cook for a further 2 minutes.

The sauce should be dark in colour, glossy and sticky.

In this Post we refer to a recipe from Nigella Lawson's "Feast" book.